猫言猫语

严以律己·宽以待人·自强不息·知行合一

k3s 安装 nfs-client 存储类

| k3s 安装 nfs-client 存储类已关闭评论

安装 nfs 服务

mkdir /data -m 777
vi /etc/exports
/data		*(rw,insecure,no_root_squash)
service nfs restart

安装 k3s 服务

curl -sfL https://get.k3s.io | sh -s - --kube-apiserver-arg "feature-gates=RemoveSelfLink=false"

如果实现已经安装过,需要手动修改启动文件

ExecStart=/usr/local/bin/k3s \
    server \
	'--kube-apiserver-arg' \
	'feature-gates=RemoveSelfLink=false' \

安装 helm

https://github.com/helm/helm/releases

curl -O https://get.helm.sh/helm-v3.8.0-linux-amd64.tar.gz
tar zxvf helm-v3.8.0-linux-amd64.tar.gz
mv linux-amd64/helm /usr/local/bin/
export KUBECONFIG=/etc/rancher/k3s/k3s.yaml

安装 nfs-client-provisioner

helm repo add moikot https://moikot.github.io/helm-charts
helm -n kube-system install nfs-client-provisioner moikot/nfs-client-provisioner --version 1.3.0 --set nfs.server=192.168.57.11 --set nfs.path=/data
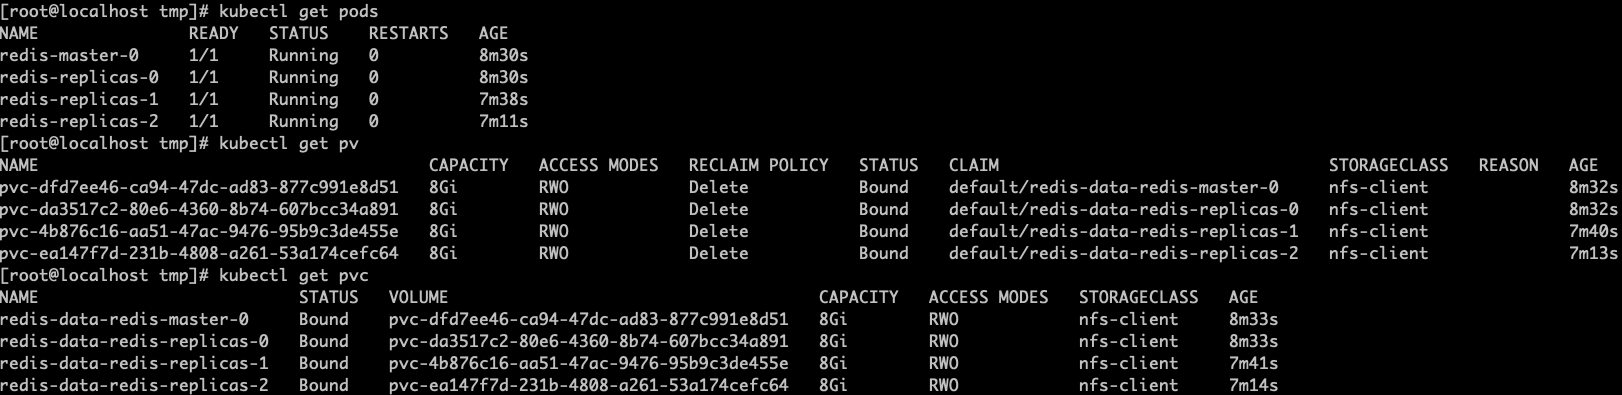
效果测试

helm repo add bitnami https://charts.bitnami.com/bitnami
helm install redis bitnami/redis --set global.storageClass=nfs-client

macOS 安装 adb 工具

| macOS 安装 adb 工具已关闭评论

brew install android-platform-tools

安装后即可执行 adb 命令

$ adb devices
* daemon not running; starting now at tcp:5037
* daemon started successfully
List of devices attached

Ubuntu 20.04 安装 K3s

| Ubuntu 20.04 安装 K3s已关闭评论

curl -sfL https://get.k3s.io | sh -
[INFO] Finding release for channel stable
[INFO] Using v1.22.5+k3s1 as release
[INFO] Downloading hash https://github.com/k3s-io/k3s/releases/download/v1.22.5+k3s1/sha256sum-amd64.txt
[INFO] Downloading binary https://github.com/k3s-io/k3s/releases/download/v1.22.5+k3s1/k3s
[INFO] Verifying binary download
[INFO] Installing k3s to /usr/local/bin/k3s
[INFO] Skipping installation of SELinux RPM
[INFO] Creating /usr/local/bin/kubectl symlink to k3s
[INFO] Creating /usr/local/bin/crictl symlink to k3s
[INFO] Creating /usr/local/bin/ctr symlink to k3s
[INFO] Creating killall script /usr/local/bin/k3s-killall.sh
[INFO] Creating uninstall script /usr/local/bin/k3s-uninstall.sh
[INFO] env: Creating environment file /etc/systemd/system/k3s.service.env
[INFO] systemd: Creating service file /etc/systemd/system/k3s.service
[INFO] systemd: Enabling k3s unit
Created symlink /etc/systemd/system/multi-user.target.wants/k3s.service → /etc/systemd/system/k3s.service.
[INFO] systemd: Starting k3s

CentOS 7 安装 EMQ X

| CentOS 7 安装 EMQ X已关闭评论

直接上命令:

sudo yum install -y yum-utils device-mapper-persistent-data lvm2
sudo yum-config-manager --add-repo https://repos.emqx.io/emqx-ce/redhat/centos/7/emqx-ce.repo
sudo yum install emqx
sudo systemctl enable emqx
sudo systemctl start emqx

打开浏览器访问目标 IP 18083 端口:

在 Docker 环境下安装 EMQ X

| 在 Docker 环境下安装 EMQ X已关闭评论

EMQ X 其实就原来的 emqttd,emqttd 最后更新是 2018 年,最后的版本停留在 2.8,如果是新安装直接安装 emqx 就可以了,不用去管原来的 emqttd。

emqx 社区版的官网地址是:https://www.emqx.io/,最新版本是 4.3.11,我们直接使用 docker 将 4.3.11 的镜像拉下跑起来:

docker run -d --name emqx -p 1883:1883 -p 8081:8081 -p 8083:8083 -p 8883:8883 -p 8084:8084 -p 18083:18083 emqx/emqx:4.3.11
Unable to find image 'emqx/emqx:4.3.11' locally
4.3.11: Pulling from emqx/emqx
8572bc8fb8a3: Pull complete
f433d2ac3a81: Pull complete
c5fb4dda1215: Pull complete
36cce342db35: Pull complete
2589c0a3d802: Pull complete
3c6240d57787: Pull complete
4d4765da292a: Pull complete
Digest: sha256:10d94b1b3c5ac96535a8cc343a8cad9591c7437af4236d28098c4f562c1ef9d8
Status: Downloaded newer image for emqx/emqx:4.3.11
08ce760f6a3eadb98dd64e4d64c8c2c2ffeac0c1e59ea2bdcc0f33a9b59aae6f

然后打开浏览器访问 18083 端口:http://localhost:18083,使用默认用户名密码:admin/public 登录

Ubuntu 20.04 安装 Docker 环境

| Ubuntu 20.04 安装 Docker 环境已关闭评论

根据系统提示,有 snap 和 apt 两种安装方式,此次我们选择 apt 的方式进行安装

sudo apt install docker.io

安装完成后普通用户无法直接执行 docker 命令,需要 sudo 才行

因此我们需要把普通用户加入到 docker 用户组内,退出重新登录,之后就可以直接使用了

sudo gpasswd -a ${USER} docker

在 Spring Cloud 中使用 Zipkin

| 在 Spring Cloud 中使用 Zipkin已关闭评论

首先使用 docker 快速启动一个 zipkin 服务器

docker run -p 9411:9411 openzipkin/zipkin

然后在 Spring Cloud 项目中添加 Zipkin 的依赖关系

<dependency>
    <groupId>org.springframework.cloud</groupId>
    <artifactId>spring-cloud-starter-zipkin</artifactId>
    <version>2.2.6.RELEASE</version>
</dependency>

启动这个 Spring Cloud 项目后随便访问一些页面,就能看到 zipkin 上有数据了。

ffmpeg 修改媒体文件格式

| ffmpeg 修改媒体文件格式已关闭评论

比如我们需要将 m4a 格式的文件转换为 mp3 格式,源文件名为:example.m4a

ffmpeg -i example.m4a example.mp3

K3s 集群环境安装

| K3s 集群环境安装已关闭评论

本次要安装的集群环境一共 3 个节点,分别是

master: 192.168.33.100
agent1: 192.168.33.110
agent2: 192.168.33.120

首先在 master 节点上执行以下命令,安装控制节点

curl -sfL https://get.k3s.io | sh -s - --node-ip=192.168.33.100

命令执行成功后,复制下来 K3S_TOKEN 后面备用

cat /var/lib/rancher/k3s/server/node-token

然后在 agent1 上执行以下命令,安装 agent 节点

curl -sfL https://get.k3s.io | K3S_URL=https://192.168.33.100:6443 K3S_TOKEN=K104815ab55b18ea44f2a947c24221d3274dd74126e4b3f7ffb70905ea62d050a15::server:6014b6e37a06c7399ddfef4723302994 sh -s - --node-ip=192.168.33.110

在 agent2 上执行以下命令,同样安装 agent 节点

curl -sfL https://get.k3s.io | K3S_URL=https://192.168.33.100:6443 K3S_TOKEN=K104815ab55b18ea44f2a947c24221d3274dd74126e4b3f7ffb70905ea62d050a15::server:6014b6e37a06c7399ddfef4723302994 sh -s - --node-ip=192.168.33.120

回到 master 节点上看看这些 agent 是否已加入集群

试着创建一个 nginx 的部署环境

kubectl create deployment nginx --image=nginx --replicas=6